Návod ukazuje, jak zapojit, nainstalovat a používat knihovnu Python k ovládání ILI9341 - displeje 2,8" SPI a Raspberry Pi . Knihovna používá připojení SPI a několik pinů GPIO k ovládání displeje, takže mnoho dalších pinů ponechává volných pro potřeby dalších projektu.
Na Raspberry Pi spusťte následující příkazy v relaci terminálu/SSH:
sudo apt-get update
sudo apt-get install build-essential python-dev python-smbus python-pip python-imaging python-numpy git
sudo pip install RPi.GPIO
Po instalaci výše uvedených závislostí můžete nainstalovat modul TFT provedením následujících příkazů:
git clone https://github.com/adafruit/Adafruit_Python_ILI9341.git
cd Adafruit_Python_ILI9341
sudo python setup.py install
Tyto příkazy naklonují úložiště GitHub se zdrojem knihovny a poté spustí skript setup.py pro instalaci knihovny.
Displej TFT SPI ILI9341
Vlastnosti:
- TFT01_2.2 SP je 2,2" SPI modul TFT LCD obrazovky, 10pinové rozhraní, kompatibilní rozhraní LCD5110 . Nejen že se rozbil LCD, ale obsahuje SD kartu (2 GB),
- LCD v TFT01 je ILI9341. Je to 240 * 320 (rozlišení), 2,2S palcový TFT LCD displej. LCD má široký pozorovací úhel, kontrast je také velmi vhodný.
- Rozhraní displeje je sériové, k ovládání potřebuje 5 vodičů (CS, RS, SCL, SDA, RST).
- Vyměňte LCD5110, podpora přímého připojení štítu joysticku ElecFreaks, EFCom, štítu klávesnice atd.
- SD karta používá hardwarové rozhraní SPI (CS / MOSI / MISO / SCK), nepájené kolíky.
Parametry:
- SDO: Výstup sériových hodin
- LED: 3,3 V IO a napájecí kolík
- SCL: Vstup pro sériové hodiny
- SDA / SDI: Sériový vstup dat
- DC: Výběr dat / příkazů
- RST: Reset, Nízká úroveň aktivní
- CS: Výběr čipu, aktivní nízká úroveň
- GND: Zem
- VDD33: 3,3V napájecí kolík
- Podpora UTFT
Zapojení
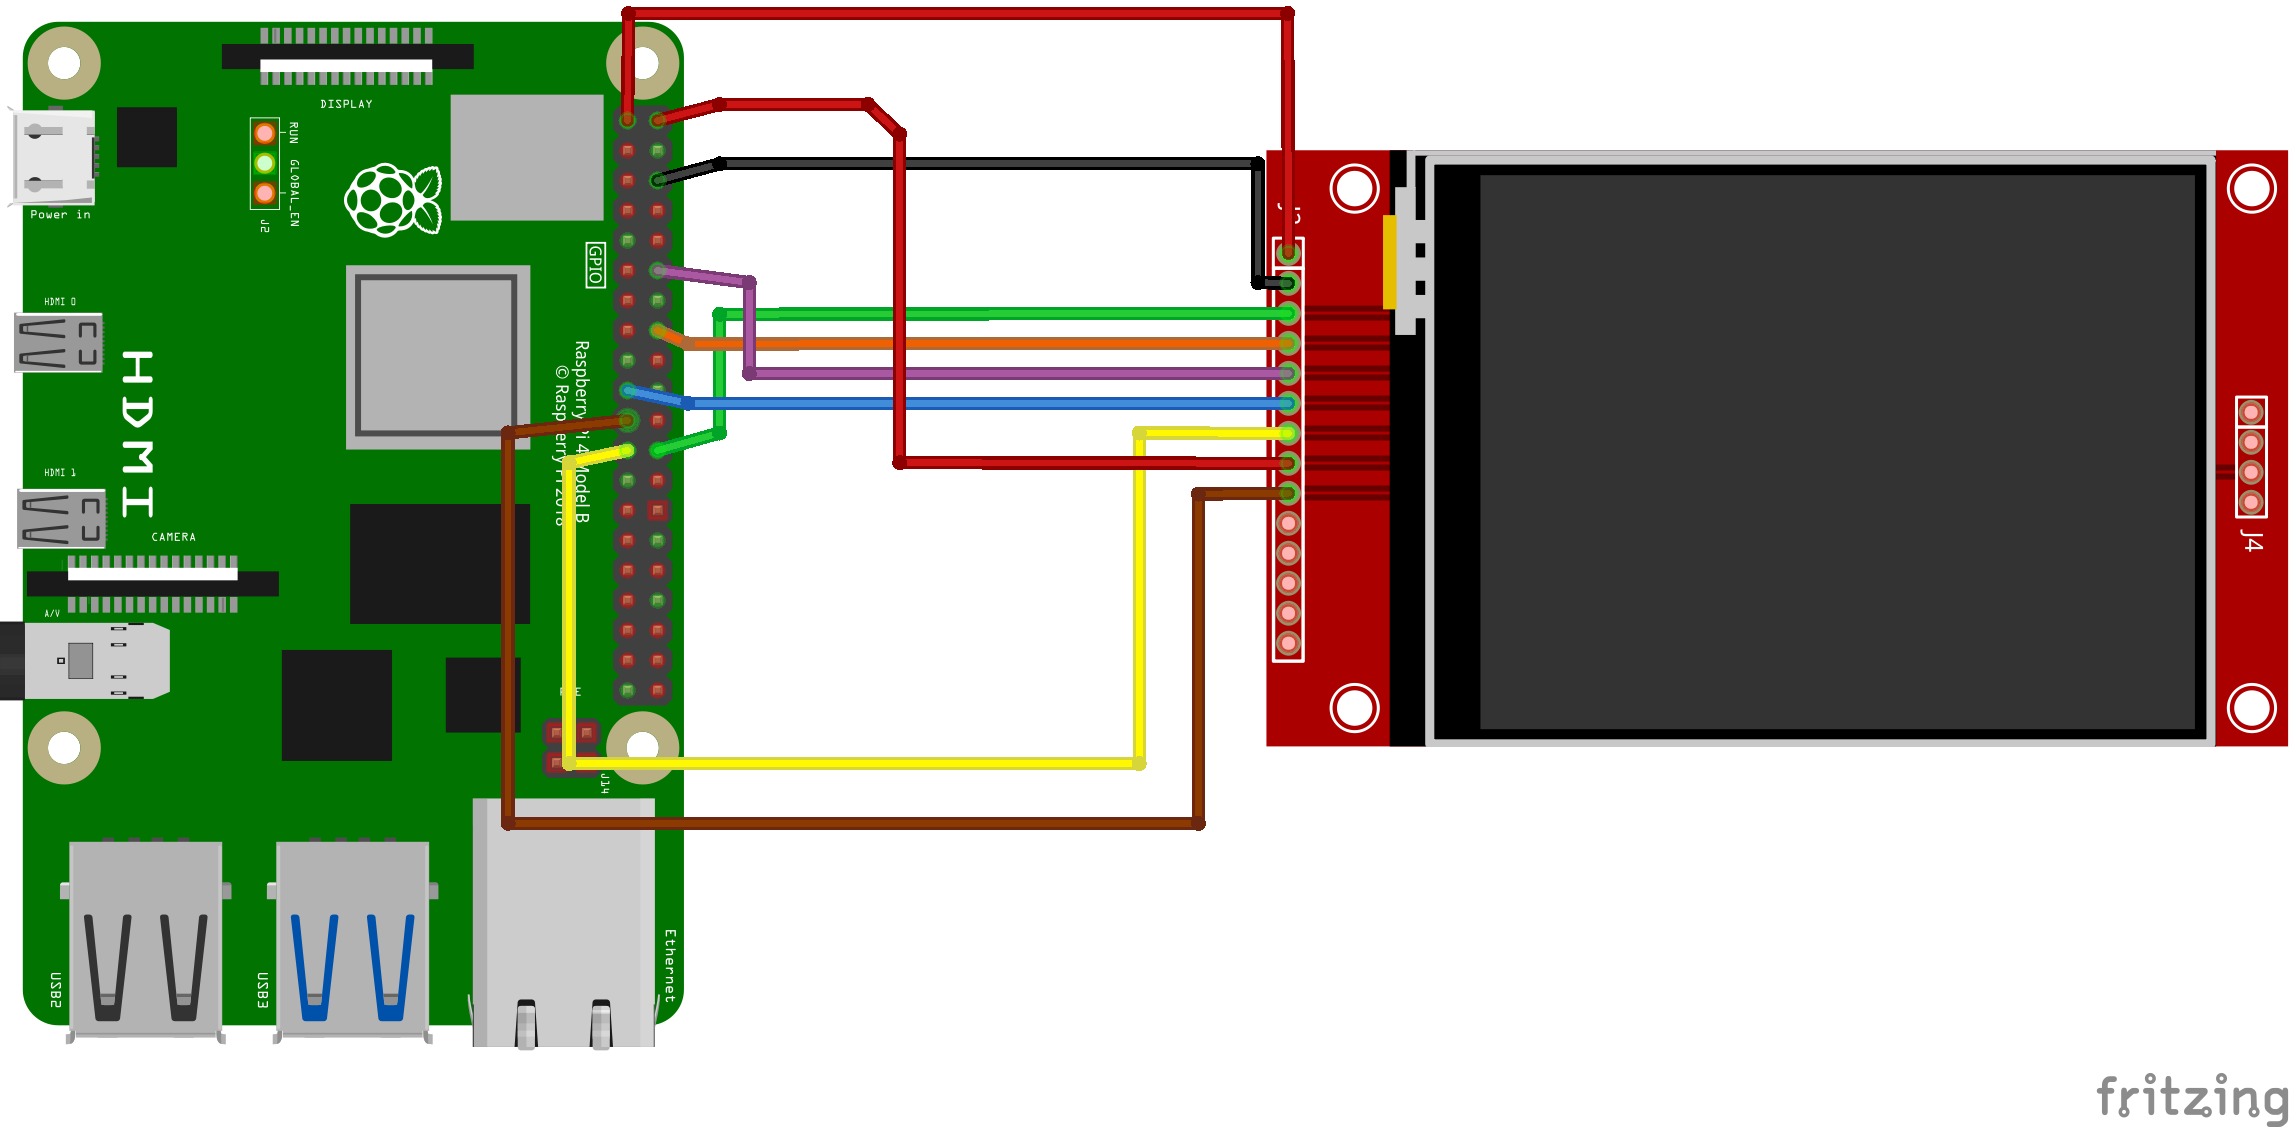
| Raspberry Pi (model B) | TFT LCD |
| Pin 3,3V | Pin VCC |
| Pin GND | Pin GND |
| GPIO18 | Pin DC |
| GPIO23 | Pin Reset |
| GPIO10 (SPI0 MOSI) | Pin SDI (MOSI) |
| GPIO11 (SPI0 SCLK) | Pin SCK |
| GPIO08 (SPI0 CE0) | Pin CS |
Programový kód - Python - zobrazení souboru obrázku
Programový kód nahraje soubor obrázku na displeji. Tento kód uložte do souboru pod názvem tft.py.
from PIL import Image

import Adafruit_ILI9341 as TFT
import Adafruit_GPIO as GPIO
import Adafruit_GPIO.SPI as SPI

# Raspberry Pi configuration.
DC = 18
RST = 23
SPI_PORT = 0
SPI_DEVICE = 0

# Create TFT LCD display class.
disp = TFT.ILI9341(DC, rst=RST, spi=SPI.SpiDev(SPI_PORT, SPI_DEVICE, max_speed_hz=64000000))

# Initialize display.
disp.begin()

# Load an image.
print ('Loading image...')
image = Image.open('iot.jpg')

# Resize the image and rotate it so it's 240x320 pixels.
image = image.rotate(90).resize((240, 320))

# Draw the image on the display hardware.
print ('Drawing image')
disp.display(image)
Spuštění kódu
python3 tft.py Programový kód - Python - zobrazení vektorových křivek
from PIL import Image
from PIL import ImageDraw
from PIL import ImageFont

import Adafruit_ILI9341 as TFT
import Adafruit_GPIO as GPIO
import Adafruit_GPIO.SPI as SPI


# Raspberry Pi configuration.
DC = 18
RST = 23
SPI_PORT = 0
SPI_DEVICE = 0

# Create TFT LCD display class.
disp = TFT.ILI9341(DC, rst=RST, spi=SPI.SpiDev(SPI_PORT, SPI_DEVICE, max_speed_hz=64000000))

# Initialize display.
disp.begin()

# Clear the display to a red background.
# Can pass any tuple of red, green, blue values (from 0 to 255 each).
disp.clear((255, 0, 0))

# Alternatively can clear to a black screen by calling:
# disp.clear()

# Get a PIL Draw object to start drawing on the display buffer.
draw = disp.draw()

# Draw some shapes.
# Draw a blue ellipse with a green outline.
draw.ellipse((10, 10, 110, 80), outline=(0,255,0), fill=(0,0,255))

# Draw a purple rectangle with yellow outline.
draw.rectangle((10, 90, 110, 160), outline=(255,255,0), fill=(255,0,255))

# Draw a white X.
draw.line((10, 170, 110, 230), fill=(255,255,255))
draw.line((10, 230, 110, 170), fill=(255,255,255))

# Draw a cyan triangle with a black outline.
draw.polygon([(10, 275), (110, 240), (110, 310)], outline=(0,0,0), fill=(0,255,255))

# Load default font.
font = ImageFont.load_default()

# Alternatively load a TTF font.
# Some other nice fonts to try: http://www.dafont.com/bitmap.php
#font = ImageFont.truetype('Minecraftia.ttf', 16)

# Define a function to create rotated text.  Unfortunately PIL doesn't have good
# native support for rotated fonts, but this function can be used to make a
# text image and rotate it so it's easy to paste in the buffer.
def draw_rotated_text(image, text, position, angle, font, fill=(255,255,255)):
    # Get rendered font width and height.
    draw = ImageDraw.Draw(image)
    width, height = draw.textsize(text, font=font)
    # Create a new image with transparent background to store the text.
    textimage = Image.new('RGBA', (width, height), (0,0,0,0))
    # Render the text.
    textdraw = ImageDraw.Draw(textimage)
    textdraw.text((0,0), text, font=font, fill=fill)
    # Rotate the text image.
    rotated = textimage.rotate(angle, expand=1)
    # Paste the text into the image, using it as a mask for transparency.
    image.paste(rotated, position, rotated)

# Write two lines of white text on the buffer, rotated 90 degrees counter clockwise.
draw_rotated_text(disp.buffer, 'Hello World!', (150, 120), 90, font, fill=(255,255,255))
draw_rotated_text(disp.buffer, 'This is a line of text.', (170, 90), 90, font, fill=(255,255,255))

# Write buffer to display hardware, must be called to make things visible on the
# display!
disp.display()